Sunday, 27 October 2013

Sunday Steals: Ikea tin pots & storage boxes

Storage is aways an issue,  especially for a junk food hoarder. My piles of junk food were starting to become an eyesore in my tiny dining space. I went to Ikea looking for a reasonably priced solution and found 2!


These cute cardboard boxes are $7 for a pack of 2, and fit a ton of stuff. Their only downfall is the lack of colour and pattern options (its either polka dots or stripes).


 But they still look waaaaay better than a pile of chip bags in the corner. You could use them for papers, textbooks or to store your seasonal clothing. 

In addition to snacks, I also hoard cacti. Probably because they're the only plants I can keep alive.

The little tree on the right is called a Cactaceae

So imagine my excitement when I found $3 cacti and $1 tin pots. The tins are great because they can also be used as stationary holders or little paper disposals. I love the metal industrial look too.  

There's my terrarium, still alive and well (for now)

Have you found any cheap goodies for your house lately?


Friday, 25 October 2013

DIY Fridays: Succulent Terrarium

Mini Homemade Terrariums

Last Saturday night was the perfect night for demolishing my friends garden. In our defence, her grandma let us. We made 6 mini succulent terrariums with soil, rocks, cacti, and succulents gathered from around the garden. 


What you need:
  • Jar or pot (I got mine from value village $2.00)
  • Plastic spoon
  • rocks
  • soil
  • succulents, cacti, moss 
Where to get your supplies
We got our plants, rocks and soil from a friend's garden. If you are tearing your plants out of soil they have already been planted in, just pull gently. These types of plants have short roots and come out easily. 

You could also buy your materials from Canadian tire, Walmart, Rona or Home Depot. Ikea has small cacti plants and succulents for $3 each. 

Directions:
1. Layer your rocks and pebbles at the bottom of your jar
2. Top rocks off with a generous amount of soil
3.Use a plastic spoon to dig tiny holes for the roots of your plants
4. cover the roots with soil until completely buried
5. If the soil is dry, water your terrarium and you're done!

Terrarium care:

  • Water your terrarium about once every 2 weeks or if the soil feels dry
  • Keep in indirect sunlight
  • Keeping it clean is crucial for healthy growth, so pick out any dead plants 
  • For more info click here 


I'm very happy with how they turned out! There lots of fun terrarium ideas floating around Pinterest. I've seen them inside christmas ornaments, fish bowls, and lightbulbs. Here are some of my favourites:


I especially like the little necklace terrariums (top right). 

If you made a terrarium of your own, let me know how it went!


Wednesday, 23 October 2013

We wish (we could afford this) Wednesdays: Green over Grey


 Green over Grey is a Vancouver based company that makes these amazing living walls. They've created a new system that allows the plants to grow vertically without soil and the best part: they have an automatic watering system. They're clean, low maintenance, and the only downside seems to be that they're out of my (and most students') price range.

http://greenovergrey.com
Can't you just imagine this beauty hanging in your living room?

What I love about the lower mainland is the balance between city and nature. You can enjoy the convenience of living in an urban centre with forests and parks just minutes away. These living walls reflect that aspect of Vancouver.  

http://greenovergrey.com
2 Amazing examples of urban home meets nature.

http://greenovergrey.com

This kitchen is on my christmas list.

http://blogs.vancouversun.com/2011/07/14/from-grey-to-green-the-beauty-of-vertical-gardens/

I found a really cool article in the Vancouver Sun about using green walls to fix some of the ugliest buildings in Vancouver. How much better does this chimney look covered in greenery? Now imagine an entire building!

Click here if you want to know more about living walls.

On a smaller scale...


I found this succulent skull at a farmer's market during my trip to Edmonton. I thought it would be a great way to add some green to my apartment. My heart said yes, but my wallet said no. Unfortunately I didn't buy him, but he inspired this weeks DIY Friday project!

What do you think about bringing the outdoors into your home?

Monday, 21 October 2013

Monday Meals: Homemade Chocolate Chai Latte

Starbucks managed to combine my two favourite things: chocolate, and chai lattes. In an attempt to save money and stay healthy I've created my own version of it:

You will need:


  • 1.5 cups Almond breeze unsweetened chocolate (Superstore $3.50 for the carton)
  • 1 Chai tea bag, any brand (I used Tazo $5.00 for the box)
  • 1 tsp Stevia or 1 tbsp honey
  • A pot 
  • A sifter
  • Your favourite mug


1. Rip open tea bag and pour contents into the almond milk
2. Bring to a boil stirring constantly
3. Let it boil for about 2 minutes while stirring


3. Remove from heat & pour through a sifter into your favourite mug


It's the best to sip on while you're studying. It's spicy, slightly sweet & delicious! You don't have to use almond milk, it can be made with any milk you desire. You could also use vanilla flavoured or plain milk for a regular chai latte.

I'd love some feedback from those who've made this!


Sunday, 20 October 2013

Sunday Steals: Payless Moccasins

Payless Shoes has $18 Moccasins!

I was a bit skeptical when I first tried these on. I thought they looked like house slippers. When I flipped the shoe over and saw $17.99 on the price sticker, I changed my mind. I wore them out of the store and I'm never taking them off.

I used the money I saved on the mocs to splurge on a fancy almond milk latte 


Happy Sunday!

Friday, 18 October 2013

DIY Fridays: butterfly wall art for under $10


Last year, someone kindly gave my boyfriend and I their almost-new dining table for FREE. Up until then we had been using a beat up wooden table that didn't go with anything in our apartment. Our new one is shiny and beautiful, and looks awesome with the rest of our furniture. I needed some artwork to hang above it that was equally as beautiful. 

You will need:
  • Something to mount the butterflies on (I used a $5 table top from the "as is" section in Ikea)
  • Poster board ($1.25 at Dollar Giant)
  • Scissors
  • Pencil
  • Hot glue gun

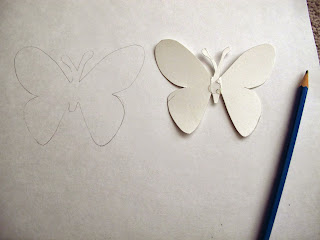
Step 1: Make a stencil
  • I used 3 different size butterflies from google images
  • Make sure to trace the butterflies on the matte side of the poster board

Step 2: Cut & Fold
  • Lay the butterfly glossy side up
  • Fold wings upward
  • They should look like they are fluttering 


Step 3: Plan & Glue

  • Before you glue, take some time to plan the layout of the butterflies 
  • Once you're happy with the arrangement squirt a little bit of glue on the bottom of the butterfly
  • Press and hold until the glue has dried 

Rip off the strings left by the glue gun and you're done!


I added some string lights from the dollar store ($1.25) because everything looks better with string lights! The small painting was a gift from the talented Ana Petre, and compliments the butterflies perfectly.

I'd love to see other versions of this. I'm thinking about making a Halloween one with flying bats. If you've given this project a shot, let me know how you made it your own!